How to take screenshots in SC4
To make good screenshots the easy way, you could use a little tool called the 'Irfan Viewer'.
It's small, free and easy to use. You find it here (just one of many places):
http://www.irfanview.com/download_sites.htm
Scroll all the way down, where you can choose a zip archive (no need to install this), download for example 'IrfanView English (Version 4.23, ZIP file, 1.15 MB)'.
Here now is a small step-by-step guide on how to make screenshots and prepare the images for upload to Simpeg Forums.
Part One: Taking screenshots
Start the program

From the menu 'Options', choose 'Capture/Screenshot'

You'll get a dialog where you can configure a few items

Make sure you tick the two encircled items. The other options you can set to your liking:
- Filename: If you leave it as is, it will save any screenshot as 'capture_02072009114520', which is just a timestamp (day,month,year,hour,minute,second).
- Destination Directory: Here you can specify a directory, where the shots will be saved.
- Save as: Specify the format you'd like to save. I'd recommend keeping it at BMP, so you have a good quality image, maybe for other purposes than a screenshot (i.e. for a gallery, or cut out details, etc.)
- Hot Key: if you want something else than the default CTRL+F11, enter your preference here (in the image it says STRG+F11, but that's just the german equivalent of CTRL :-).
Once you're all set, click on 'Start', the program will minimize to the taskbar and wait for your 'shoot'-commands. Just start your game and press CTRL+F11 any time you want to take a screenshot – as often as you want, they'll be all collected in the specified directory.
Remember: Before you shoot, you may want to turn of all the ingame menues and also disable the grid (hit 'G').
Part Two: Preparing screenshots for upload
When you have taken all needed screenshots, exit the game and open the specified directory to access your collection.

If you have prepared a shortcut to Irfan, you can just pull any image onto that shortcut to open it.

Now this is what the screens usually look like

If you want to get rid of the yellow frame or get a certain area only, just draw a frame around the desired area (point, hold left mousebutton and pull frame diagonally).

TIP: My buddy Craig just came up with a fine hint – to get rid of the yellow frame (during paused game), just download the following mod – that'll take care of that pesky thing for good :-)
SMP Yellow Pause thingy remover
From the menu 'Edit' choose the option 'Crop selection'.

You're left with the previously "framed" area.

Now to bring it to the right size – for example, at Simpeg the allowed maximum width of images is 640 pixels, so let's go for that. From the menu 'Image' choose the option 'Resize/Resample'.

That will give you the following dialog:

There is not really much you need to adjust (unless you are very familiar with processing/enhancing images).

Again, make sure the encircled items are ticked (enabled).
All you need to do now is to type in the desired width (640), the proper height will be figured out by the program (if you have correctly ticked 'Preserve aspect ratio'!).
It is also a good idea to change the listed 'DPI' to a value of '72', as anything higher than that won't mean anything to the web ;-). But if you forget it, nothing dramatic will happen. All the other settings don't really mean anything in our context, so just disregard them. Hit 'OK' and you're all set to save your image.
So choose 'Save as...' from the menu 'File'.
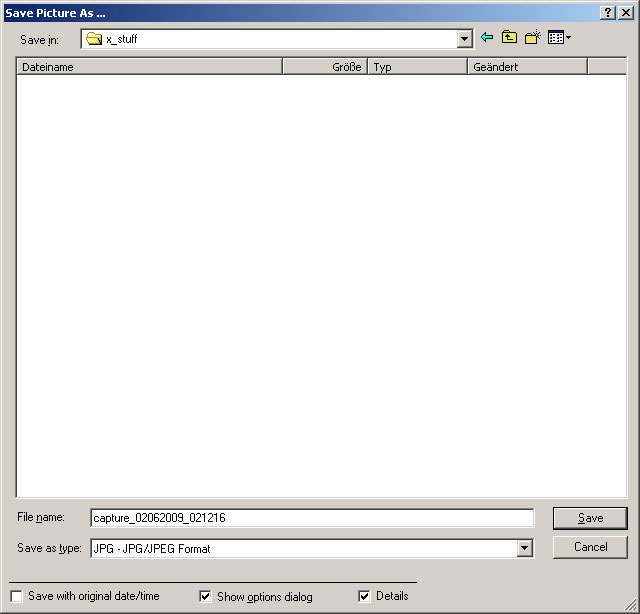
Well, this is all pretty straight forward ... set a filename, choose a directory ... but pay attention to the last select-box 'Save as type': Open the list and select 'JPG/JPEG' as fileformat! The moment you select this, an additional dialog attaches itself to the save-window.

Your only concern here is that sliderbar right at the top, 'Save quality'. With that you determine how much you compress the image, which has considerable impact on filesize as well as image-quality. The more you compress, the lousier the quality becomes, so you may want to experiment a little to find a good compromise. I'd recommend to keep the slider somewhere between 80 and 90 (which means a compression of 10 to 20%). That will leave you with an acceptable result, a screenshot of 640(fixed)x~480(variable) pixels weighing in at about 120Kb. More weight is not necessary and, btw., not really friendly ;-))
Oh yeah, right – don't forget to hit the 'Save'-button to finish off the whole operation.
If you have questions or comments regarding this demo, feel free to join the simpeg forums.